# BOM
# 定时器和延时器
setInterval():循环调用。将一段代码,每隔一段时间执行一次。(循环执行)
setTimeout():延时调用。将一段代码,等待一段时间之后****再执行。(只执行一次)
**备注:**在实际开发中,二者是可以根据需要,互相替代的。
# 定时器setInterval()
setInterval()函数可以重复调用一个函数,在每次调用之间具有固定的时间间隔
 setInterval(function(){},2000) //这个函数自动被以固定间隔时间调用
//第一个参数是函数
//第二个参数是间隔时间 以毫秒为单位  1000毫秒 === 1秒
2
3
方式一:匿名函数
每间隔一秒,将 数字 加1:
let num = 1;
setInterval(function () {
    num ++;
    console.log(num);
}, 1000);
2
3
4
5
方式二:
let num = 1;
function fn() {
    num ++;
    console.log(num);
}
setInterval(fn,1000); //具名函数注意这里不要加()圆括号
2
3
4
5
6
函数的参数
setInterval()函数可以接收第3、4.......个参数,它们将按顺序传入函数
setInterval(function(a , b){
    console.log(a+b);
} , 1000 , 10, 20);
//从第三个参数开始,表示传入函数内的参数


//具名函数传参
let num = 1;
function fn(a, b) {
    num++;
    console.log(num);
    console.log(a + b);
}

setInterval(fn, 1000, 10, 20);
2
3
4
5
6
7
8
9
10
11
12
13
14
15
# 清除定时器
**clearInterval()**函数可以清除一个定时器
定时器的返回值是作为这个定时器的唯一标识,可以用来清除定时器
假设定时器setInterval()的返回值是
参数1,那么clearInterval(参数1)就可以清除定时器。clearTimeout()函数可以清除延时器 和clearInterval()函数道理是一样的
代码举例1
<script>
    let num = 1;

   	let timer = setInterval(function () {
        console.log(num);  //每间隔一秒,打印一次num的值
        num ++;
        if(num === 5) {  //打印四次之后,就清除定时器
            clearInterval(timer);
        }

    }, 1000);
</script>
2
3
4
5
6
7
8
9
10
11
12
代码举例2
setInterval容易造成事件堆积,当时间太短事件执行不过来
<body>
    <h1 id="info">0</h1>
    <input type="button" id="start" value="开始" />
    <input type="button" id="end" value="暂停" />

    <script>
      let oInfo = document.getElementById("info");
      let oStart = document.getElementById("start");
      let oEnd = document.getElementById("end");

      let a = 0;
      // 全局变量
      let timer;

      oStart.onclick = function () {
        // 为了防止定时器叠加,我们应该在设置定时器之前先清除定时器
        clearInterval(timer);
        // 更改全局变量timer的值为一个定时器实体
        timer = setInterval(function () {
          oInfo.innerText = ++a;
        }, 1000);
      };

      oEnd.onclick = function () {
        clearInterval(timer);
      };
    </script>
  </body>
2
3
4
5
6
7
8
9
10
11
12
13
14
15
16
17
18
19
20
21
22
23
24
25
26
27
28
# 延时器setTimeout()
setTimeout()函数可以设置一个延时器,当指定时间到了之后,会执行函数一次,不再重复执行。
setTimeout(function(){
    //这个函数会在2秒之后执行一次
},2000)
// 参数1:回调函数,该函数会每隔一段时间被调用一次。
// 参数2:每次调用的间隔时间,单位是毫秒。
2
3
4
5
代码举例1
setTimeout(function() {
    console.log(1); // 3秒之后,再执行这段代码。
}, 3000);
2
3
代码举例2
<body>
    <input type="button" id="btn1" value="2秒后弹出你好">
    <input type="button" id="btn2" value="取消弹出">

    <script>
        let btn1 = document.getElementById("btn1");
        let btn2 = document.getElementById("btn2");
        let timer;

        btn1.onclick = function () {
            timer = setTimeout(function () {
                alert("您好");
            }, 2000);
        };
        btn2.onclick = function(){
            clearTimeout(timer);
        }
    </script>
2
3
4
5
6
7
8
9
10
11
12
13
14
15
16
17
18
setTimeout() 举例:5秒后关闭网页两侧的广告栏
假设网页两侧的广告栏为两个img标签,它们的样式为:
<style>
    ...
    ...

</style>
2
3
4
5
5秒后关闭广告栏的js代码为:
<script>
    window.onload = function () {
        //获取相关元素
        let imgArr = document.getElementsByTagName("img");
        //设置定时器:5秒后关闭两侧的广告栏
        setTimeout(fn,5000);
        function fn(){
            imgArr[0].style.display = "none";
            imgArr[1].style.display = "none";
        }
    }
</script>
2
3
4
5
6
7
8
9
10
11
12
通过setInterval方法实现网页动画的例子。
<style>
    #someDiv {
width: 200px;
height: 200px;
background-color: pink;
}
    </style>
</head>
<body>
        <div id="someDiv"></div>

<script>
            let div = document.getElementById("someDiv");
let opacity = 1;
let fader = setInterval(function () {
    opacity -= 0.1;
    if (opacity >= 0) {
        div.style.opacity = opacity;
    } else {
        clearInterval(fader);
    }
}, 1000);
</script>
2
3
4
5
6
7
8
9
10
11
12
13
14
15
16
17
18
19
20
21
22
23
# 小练习
let num = 0;
let max = 10;

//每隔一秒钟num递增一次 , 直到num的值大于等于Max清除
let timer = setInterval(function () {
    num++;
    console.log(num);
    if (num >= max) {
        clearInterval(timer);
    }
}, 1000);
2
3
4
5
6
7
8
9
10
11
如果要多次调用,可以让code自身再次调用setTimeout ()
let num = 0;
let max = 10;
function increaseNum() {
    num++;
    console.log(num);
    if (num >= max) {
        clearTimeout(increaseNum);
    } else {
        setTimeout(increaseNum, 1000);
    }
}
setTimeout(increaseNum, 1000);
2
3
4
5
6
7
8
9
10
11
12
# 初步认识异步语句
JavaScript是单线程语言,
单线程就是所执行的代码必须按照顺序。
基于JS是单线程语言
setInterval()和setTimeout()是两个异步语句
异步(asynchronous) :不会阻塞CPU继续执行其他语句,当异步完成时,会执行“回调函数”(callback)
异步不会阻塞代码执行
同步会阻塞代码执行
代码举例1
<script>
    console.log(100);
    setTimeout(function(){
        console.log(200);//回调函数
    },1000);//异步语句  异步语句不会阻塞程序的正常执行
    console.log(300);

    //先打印100 300 等待1秒之后再执行200
</script>
2
3
4
5
6
7
8
9
setTimeout 笔试题
console.log(1)
setTimeout(function(){
    console.log(2)
} ,1000)
console.log(3)
setTimeout(function () {
    console.log(4)
},0)
console.log(5)
2
3
4
5
6
7
8
9
//同步
console.log(100);
alert(200);
console.log(300);
//先打印100 弹出200 点击确定后打印300
2
3
4
5
# 使用定时器实现动画
使用定时器可以实现动画,利用的就是“视觉暂留”原理
使用定时器实现动画较为不便:
1.不方便根据动画总时间计算步长
2.运动方向要设置正负
3.多种运动进行叠加较为困难(比如一个方形一边移动—边变为圆形)
举例
按下按钮盒子移动
<style>
    #box {
        position: absolute;
        top: 100px;
        left: 100px;
        width: 100px;
        height: 100px;
        background-color: orange;
    }
</style>
</head>
<body>
    <input type="button" id="btn" value="开始运动" />

    <div id="box"></div>

    <script>
        let oBtn = document.getElementById("btn");
        let oBox = document.getElementById("box");

        // 全局变量盒子的left值
        let left = 100;

        oBtn.onclick = function () {
            //改变全局变量
            let timer = setInterval(function () {
                // 改变全局变量
                // 两千毫秒之内移动一千像素
                left += 10;

                if (left >= 1100) {
                    clearInterval(timer);
                }

                oBox.style.left = left + "px";
            }, 20);
        };
    </script>
</body>
2
3
4
5
6
7
8
9
10
11
12
13
14
15
16
17
18
19
20
21
22
23
24
25
26
27
28
29
30
31
32
33
34
35
36
37
38
39
# JS和CSS3结合实现动画
我们知道,CSS3的transition过渡属性可以实现动画
JavaScript可以利用CSS3的transition属性轻松实现元素
JS和CSS3结合实现动画规避了定时器制作动画的缺点
改写之前的代码
<body>
    <input type="button" id="btn" value="开始运动" />

    <div id="box"></div>

    <script>
      let oBtn = document.getElementById("btn");
      let oBox = document.getElementById("box");

      // 全局变量盒子的left值
      let left = 100;

      oBtn.onclick = function () {
        oBox.style.transition = "2s ease";
        oBox.style.left = "1100px";
      };
    </script>
2
3
4
5
6
7
8
9
10
11
12
13
14
15
16
17
如果我们想再次点击按钮盒子往左边来移动
<style>
    #box {
        position: absolute;
        top: 100px;
        left: 100px;
        width: 100px;
        height: 100px;
        background-color: orange;
    }
</style>
</head>
<body>
    <input type="button" id="btn" value="开始运动" />

    <div id="box"></div>

    <script>
        let oBtn = document.getElementById("btn");
        let oBox = document.getElementById("box");

        // 全局变量盒子的left值
        let left = 100;

        // 标识量 指示当前盒子在左边还是右边
        let pos = true; //true左边 false右边

        oBtn.onclick = function () {
            //把过渡加上
            oBox.style.transition = "2s ease";
            if (pos == true) {
                //瞬间移动 但是有过渡 就有动画
                oBox.style.left = "1100px";
                pos = false;
            } else if (pos == false) {
                oBox.style.left = "100px";
                pos = true;
            }
        };

        //代码改进一下
        oBtn.onclick = function () {
            oBox.classList[pos ? "add" : "remove"]("move-left");
            pos = !pos
        }
2
3
4
5
6
7
8
9
10
11
12
13
14
15
16
17
18
19
20
21
22
23
24
25
26
27
28
29
30
31
32
33
34
35
36
37
38
39
40
41
42
43
44
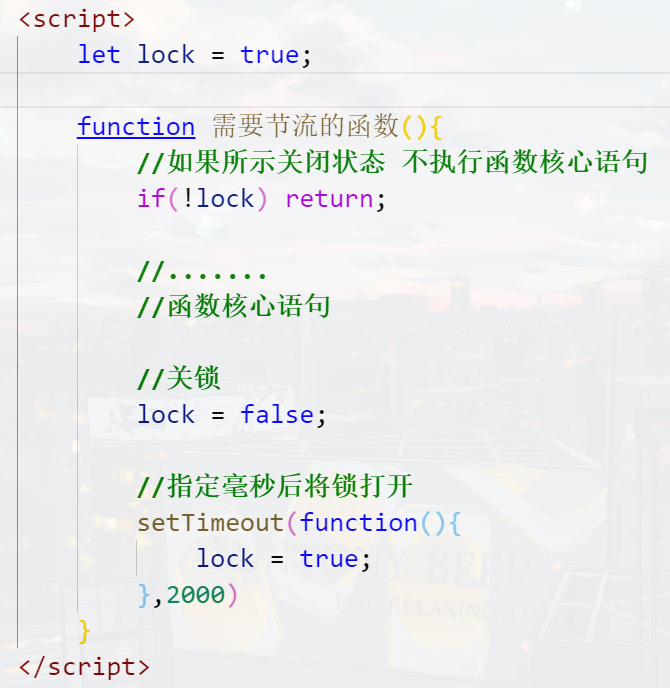
# 函数节流
函数节流:一个函数执行一次后,只有大于设定的执行周期后才允许执行第二次
函数节流非常容易实现,只需要借助setTimeout()延时器
代码公式
<style>
    #box {
        position: absolute;
        top: 100px;
        left: 100px;
        width: 100px;
        height: 100px;
        background-color: orange;
        transition: 2s ease;
    }

    #box.move-left {
        left: 1100px;
    }
</style>
</head>
<body>
    <input type="button" id="btn" value="开始运动" />

    <div id="box"></div>

    <script>
        let oBtn = document.getElementById("btn");
        let oBox = document.getElementById("box");

        // 全局变量盒子的left值
        let left = 100;

        // 标识量 指示当前盒子在左边还是右边
        let pos = true; //true左边 false右边

        let lock = true;
        oBtn.onclick = function () {
            // 首先检查锁是否关上
            if (!lock) return;

            oBox.classList[pos ? "add" : "remove"]("move-left");
            pos = !pos;

            // 关锁
            lock = false;

            //两秒后开锁
            setTimeout(function () {
                lock = true;
            }, 2000);
        };
    </script>
</body>
2
3
4
5
6
7
8
9
10
11
12
13
14
15
16
17
18
19
20
21
22
23
24
25
26
27
28
29
30
31
32
33
34
35
36
37
38
39
40
41
42
43
44
45
46
47
48
49


# 无缝连续滚动特效
<style>
    * {
        margin: 0;
        padding: 0;
    }
    ul {
        list-style: none;
    }

    #wrap {
        overflow: hidden;
        width: 850px;
        border: 4px solid #000;
        margin: 50px auto;
    }

    #wrap ul {
        position: relative;
        display: flex;
        width: 5000px;
    }

    #wrap ul li {
        margin-right: 10px;
    }
</style>
</head>
<body>
    <div id="wrap">
        <ul id="list">
            <li>
                <img src="https://s1.ax1x.com/2020/10/11/0g5pVO.th.png" alt="" />
            </li>
            <li>
                <img src="https://s1.ax1x.com/2020/10/11/0g5FGd.th.png" alt="" />
            </li>
            <li>
                <img src="https://s1.ax1x.com/2020/10/11/0g5udS.th.png" alt="" />
            </li>
            <li>
                <img src="https://s1.ax1x.com/2020/10/11/0g5YLV.th.png" alt="" />
            </li>
            <li>
                <img src="https://s1.ax1x.com/2020/10/11/0g5aoF.th.png" alt="" />
            </li>
            <li>
                <img src="https://s1.ax1x.com/2020/10/11/0g50JJ.th.png" alt="" />
            </li>
        </ul>
    </div>

    <script>
        let oWrap = document.getElementById("wrap");
        let oList = document.getElementById("list");

        //复制多一遍所有的li
        list.innerHTML += list.innerHTML;

        //全局变量 表示当前list的left值
        let left = 0;

        //定时器变量
        let timer;

        move();

        //设置定时器
        function move() {
            // 设表先关
            clearInterval(timer);

            timer = setInterval(function () {
                left -= 4;

                //验收
                if (left < -1010) {
                    left = 0;
                }

                oList.style.transform = `translateX(${left}px)`;
            }, 20);
        }

        // 鼠标进入停止定时器
        oWrap.onmouseenter = function () {
            clearInterval(timer);
        };
        // 鼠标进入离开定时器
        oWrap.onmouseleave = function () {
            move();
        };
    </script>
</body>
2
3
4
5
6
7
8
9
10
11
12
13
14
15
16
17
18
19
20
21
22
23
24
25
26
27
28
29
30
31
32
33
34
35
36
37
38
39
40
41
42
43
44
45
46
47
48
49
50
51
52
53
54
55
56
57
58
59
60
61
62
63
64
65
66
67
68
69
70
71
72
73
74
75
76
77
78
79
80
81
82
83
84
85
86
87
88
89
90
91
92
93
# 跑马灯轮播图
<!DOCTYPE html>
<html lang="en">
<head>
<meta charset="UTF-8" />
<meta name="viewport" content="width=device-width, initial-scale=1.0" />
<title>Document</title>
<style>
* {
margin: 0;
padding: 0;
}
#wrap {
overflow: hidden;
position: relative;
width: 1226px;
height: 580px;
margin: 200px auto 0;
}
#wrap .imglist {
position: relative;
left: 0;
display: flex;
width: 100%;
height: 100%;
transition: 0.7s ease;
}
#wrap .imglist img {
width: 100%;
height: 100%;
cursor: pointer;
}
#wrap a {
position: absolute;
top: 50%;
transform: translate(0, -50%);
display: block;
width: 40px;
height: 70px;
background-color: rgba(0, 0, 0, 0.7);
color: white;
user-select: none;
font-size: 30px;
text-align: center;
line-height: 70px;
text-decoration: none;
}
#wrap a.left {
left: 0;
}
#wrap a.right {
right: 0;
}
</style>
</head>
<body>
<div id="wrap">
<div class="imglist">
<img src="https://s1.ax1x.com/2020/09/26/0irm1P.jpg" alt="" />
<img src="https://s1.ax1x.com/2020/09/26/0irQ0g.jpg" alt="" />
<img src="https://s1.ax1x.com/2020/09/26/0ir8ts.jpg" alt="" />
<img src="https://s1.ax1x.com/2020/10/11/0gbKoV.jpg" alt="" />
<img src="https://s1.ax1x.com/2020/10/11/0gb7Os.jpg" alt="" />
</div>
<div class="arrow">
<a href="javascript:;" class="left"><</a>
<a href="javascript:;" class="right">></a>
</div>
</div>
<script>
//得到按钮和图片列表整体进行运动
let oLeft = document.querySelector("#wrap .arrow .left");
let oRight = document.querySelector("#wrap .arrow .right");
let oImgList = document.querySelector("#wrap .imglist");
let cloneImg = oImgList.firstElementChild.cloneNode();
oImgList.appendChild(cloneImg);
// 当前ul显示到第几张了,从0开始数
let index = 0;
// 节流锁
let lock = true;
oRight.onclick = function () {
// 判断锁的状态
if(!lock) return;
//给list加过渡,为什么要加? ? css中不是已经加了么??这是因为最后一张图片会把过渡去掉
oImgList.style.transition = "0.7s ease";
index++;
if (index > 4) {
//设置一个延时器,延时器的功能就是将ul瞬间拉回0的位置,延时器的目的就是让动画结束之后
setTimeout(function () {
//取消掉过渡,因为要的是瞬间移动,不是“咕噜”回去
oImgList.style.transition = "none";
oImgList.style.left = 0;
index = 0;
}, 700);
}
oImgList.style.left = -index * 1226 + "px";
lock = false;
// 函数节流
setTimeout(function(){
lock = true;
},700)
};
oLeft.onclick = function () {
// 判断锁的状态
if(!lock) return;
//判断是不是第0张,如果是,就要瞬间用假的替换真的
if (index == 0) {
//取消掉过渡,因为要的是瞬间移动,不是“咕噜”过去
oImgList.style.transition = "none";
oImgList.style.left = -5 * 1226 + "px";
//设置一个延时器,这个延时器的延时时间可以是0毫秒,虽然是0毫秒,但是可以让我们 过渡先是瞬间取消,然后再加上
setTimeout(function () {
//加过渡
oImgList.style.transition = "0.7s ease";
//idx改为真正的最后一张图片的编号
index = 4;
oImgList.style.left = -4 * 1226 + "px";
}, 0);
} else {
index--;
oImgList.style.left = -index * 1226 + "px";
}
lock = false;
// 函数节流
setTimeout(function(){
lock = true;
},700)
};
</script>
</body>
</html>
2
3
4
5
6
7
8
9
10
11
12
13
14
15
16
17
18
19
20
21
22
23
24
25
26
27
28
29
30
31
32
33
34
35
36
37
38
39
40
41
42
43
44
45
46
47
48
49
50
51
52
53
54
55
56
57
58
59
60
61
62
63
64
65
66
67
68
69
70
71
72
73
74
75
76
77
78
79
80
81
82
83
84
85
86
87
88
89
90
91
92
93
94
95
96
97
98
99
100
101
102
103
104
105
106
107
108
109
110
111
112
113
114
115
116
117
118
119
120
121
122
123
124
125
126
127
128
129
130
131
132
133
134
135
136
137
138
139
140
141
142
143
144
145
146
147
148
Math.random() 0<=r<1 随机小数
从min~max之间取随机整数:
Math.floor(Math.random()*(max-min+1)+min)
从0~n之间去随机: Math.floor(Math.random()*(n+1));
随机色卡
<style>
    #wrap p {
        float: left;
        width: 150px;
        height: 30px;
        margin: 3px;
        text-align: center;
        line-height: 30px;
        color: #fff;
        font-size: 12px;
        font-weight: bold;
    }
</style>
</head>
<body>
    <div id="wrap"></div>

    <script>


        (function () {
            let oWrap = document.getElementById("wrap");

            function RandomColorCard() {
                let r = parseInt(Math.random() * 256);
                let g = parseInt(Math.random() * 256);
                let b = parseInt(Math.random() * 256);
                console.log(r,g,b);

                let oP = document.createElement("p");

                oP.innerHTML = `<p style="background-color:rgb(${r},${g},${b})"> rgb(${r},${g},${b}) </p>`;

                oWrap.appendChild(oP);
            }

            setInterval(RandomColorCard, 500);
        })();
    </script>
2
3
4
5
6
7
8
9
10
11
12
13
14
15
16
17
18
19
20
21
22
23
24
25
26
27
28
29
30
31
32
33
34
35
36
37
38
39
<style>
    #wrap {
        position: relative;
        width: 500px;
        height: 500px;
        border: 1px solid orange;
        border-radius: 50%;
        margin: 50px auto 0;
        /*animation: roll 3s linear infinite;*/
    }

    #wrap .circle {
        position: absolute;
        top: 0;
        left: 50%;
        width: 30px;
        height: 30px;
        background-color: pink;
        border-radius: 50%;
        margin-top: -15px;
        margin-left: -15px;
    }

    /*@keyframes roll {
    from{
    transform: rotate(0deg);
    }
    to{
    transform: rotate(360deg);
    }
    }*/
</style>
</head>
<body>
    <div id="wrap">
        <p class="circle"></p>
    </div>

    <script>
        let oWrap = document.getElementById("wrap");

        let r = 0;
        setInterval( () => {
            r += 1;
            oWrap.style.transform = `rotate(${r}deg)`;
        }, 1000 / 60);

        //function rotate() {
        //  r += 5;
        //  oWrap.style.transform = `rotate(${r}deg)`;
        //  requestAnimationFrame(rotate);
        //}

        //rotate();
    </script>
2
3
4
5
6
7
8
9
10
11
12
13
14
15
16
17
18
19
20
21
22
23
24
25
26
27
28
29
30
31
32
33
34
35
36
37
38
39
40
41
42
43
44
45
46
47
48
49
50
51
52
53
54
55
# BOM是什么
window对象是当前JS脚本运行所处的窗口,而这个窗口中包含DOM结构,window.document属性就是document对象
在有标签页功能的浏览器中,每个标签都拥有自己的window对象;也就是说,同一个窗口的标签页之间不会共享一个 window对象
全局变量会成为window对象的属性
var a = 10;
console.log(window.hasOwnProperty("a")); //true
console.log(window.a == a);  //true
2
3
这就意味着,多个js文件之间是共享全局作用域的,即js文件没有作用域隔离功能
内置函数普遍是window的方法
如setlnterval()、alert()等内置函数,普遍是window的方法
console.log(window.hasOwnProperty("alert")); //true
console.log(window.hasOwnProperty("setTimeout")); //true

window.setInterval(function () {
    window.console.log('你好');
	},1000);
}
2
3
4
5
6
7
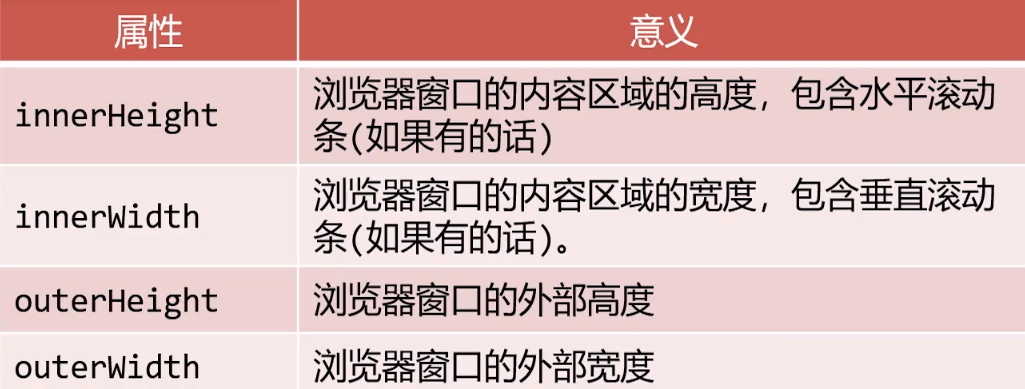
获得不包含滚动条的窗口宽度
document.documentElement.clientWidth
console.log("窗口的内宽(包含滚动条)" + window.innerWidth );
console.log("窗口的内宽(不含滚动条)" + document.documentElement.clientWidth );
console.log("窗口的外宽" + window.outerWidth );
2
3
# resize事件
在窗口大小改变之后,就会触发resize事件,
可以使用window.onresize或者window.addEventListener('resize')来绑定事件处理函数
window.onresize = function () {
    let root = document.documentElement;
    console.log("窗口尺寸改变了", root.clientWidth, root.clientHeight);
};
2
3
4
# window.close
Window对象的方法
<input type="button" value="退 出" id="quit">

<script>
var quit = document.getElementById("quit");

quit.onclick = function () {
    window.close();
}
</script>
2
3
4
5
6
7
8
9
setTimeout(function(){
	window.close();
},2000)
2
3
# onfocus/onblur
onfocus - 进入当前标签页时触发(包括切换标签页,从任务栏最大化浏览器时)
onblur - 离开当前标签页时触发 (包括切换标签页,将浏览器最小化到任务栏时)
常用来配合 title 做一些操作
window.onfocus = function(){
    document.title = "云牧大帅比的个人博客";
}

window.onblur = function(){
    document.title = "云牧大帅比离开了";
}

//或者离开页面停止定时器
2
3
4
5
6
7
8
9
# scroll事件
在窗口被卷动之后,就会触发scroll事件
可以使用window.onscroll或者window.addEventListener('scroll')来绑定事件处理函数
# 已卷动高度
window.scrollY属性表示在垂直方向已滚动的像素值
document.documentElement.scrollTop属性也表示窗口卷动高度
兼容写法
let scrollTop = window.scrollY || document.documentElement.scrollTop
注意
document.documentElement.scrollTop不是只读的,而window.scrollY是只读的
举例
<body style="height: 3000px;">
    <script>
        console.log(window.scrollY);
        console.log(document.documentElement.scrollTop);

        document.documentElement.scrollTop = 1000;
    </script>
</body>
2
3
4
5
6
7
8
# Navigator 对象
window.navigator属性可以检索navigator对象,它内部含有用户此次活动的浏览器的相关属性和标识
Navigator代表当前浏览器的信息,通过该对象可以识别不同的浏览器。由于历史原因,Navigator对象中的大部分属性都已经不能帮助我们识别浏览器了。
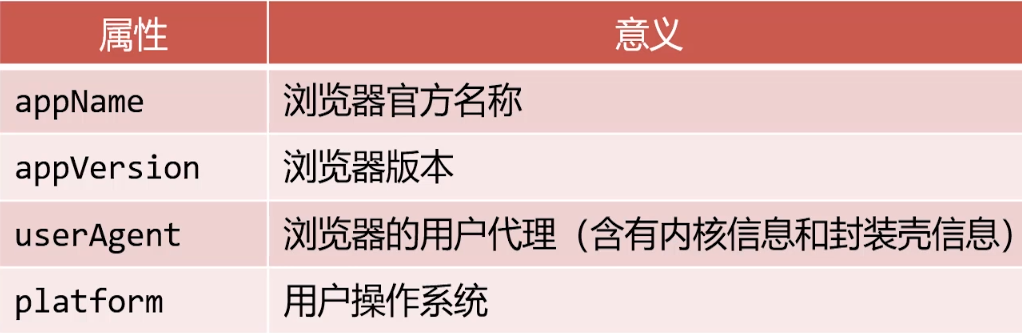
一般我们只会使用navigator.userAgent来获取浏览器的信息。userAgent 的值是一个字符串,简称 UA,这个字符串中包含了用来描述浏览器信息的内容,不同的浏览器会有不同的userAgent。
举例
console.log("浏览器的品牌" , navigator.appName);
console.log("浏览器的版本" , navigator.appVersion);
console.log("用户代理" , navigator.userAgent);
console.log("操作系统" , navigator.platform);
2
3
4
在电脑上模拟移动端浏览器
不同浏览器(包括微信内置的浏览器)的 userAgent 信息,是不一样的,我们可以根据
navigator.userAgent属性来获取。
比如说,我们在电脑浏览器上,按F12,然后在控制台输入navigator.userAgent,如下:
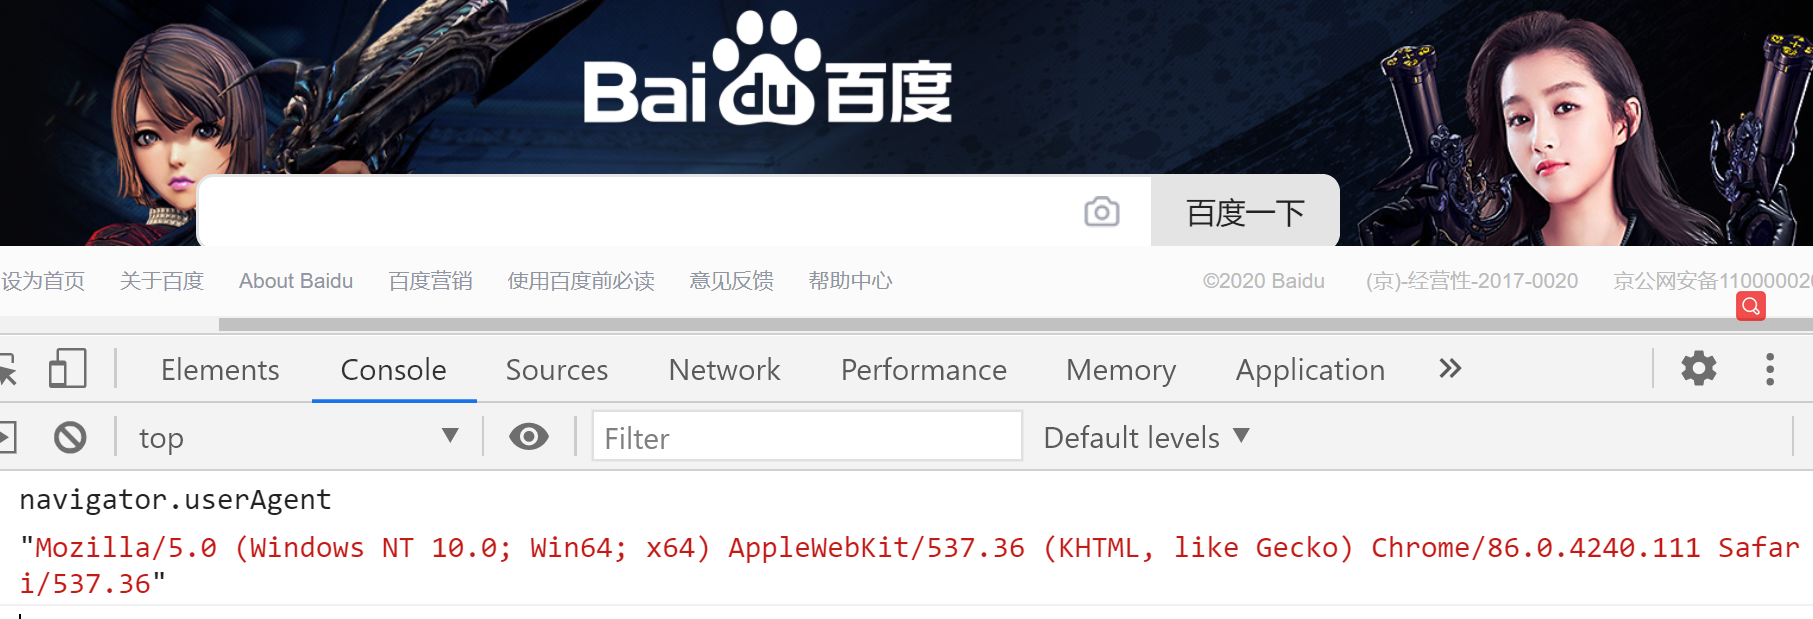
MacOS上的Chrome浏览器的 userAgent 是:

我们还可以在电脑浏览器的控制台里可以添加很多设备,通过这种方式,可以模拟移动端浏览器的场景,非常有用,请务必掌握。操作如下:
iOS 版微信浏览器:
Mozilla/5.0 (iPhone; CPU iPhone OS 9_3 like Mac OS X) AppleWebKit/601.1.46 (KHTML, like Gecko) Mobile/13E233 MicroMessenger/6.3.15 NetType/WIFI Language/zh_CN
Android 版微信浏览器:
Mozilla/5.0 (Linux; Android 5.0.1; GT-I9502 Build/LRX22C; wv) AppleWebKit/537.36 (KHTML, like Gecko) Version/4.0 Chrome/43.0.2357.121 Mobile Safari/537.36 MicroMessenger/6.1.0.78_r1129455.543 NetType/WIFI
iOS 版本QQ浏览器:
Mozilla/5.0 (iPhone; CPU iPhone OS 11_2_2 like Mac OS X) AppleWebKit/604.4.7 (KHTML, like Gecko) Mobile/15C202 QQ/7.3.5.473 V1_IPH_SQ_7.3.5_1_APP_A Pixel/1125 Core/UIWebView Device/Apple(iPhone X) NetType/WIFI QBWebViewType/1
Android 版 QQ浏览器:
Mozilla/5.0 (Linux; Android 4.4.2; PE-TL20 Build/HuaweiPE-TL20; wv) AppleWebKit/537.36 (KHTML, like Gecko) Version/4.0 Chrome/57.0.2987.132 MQQBrowser/6.2 TBS/043807 Mobile Safari/537.36 V1_AND_SQ_7.3.2_762_YYB_D QQ/7.3.2.3350 NetType/WIFI WebP/0.3.0 Pixel/1080
# History对象
window.history对象提供了操作浏览器会话历史的接口
常用操作就是模拟浏览器回退按钮
方法1:
解释:用来回退到上一个页面,作用和浏览器的「回退按钮」一样。
history.back();//等同于点击浏览器的回退按钮
方法2:
解释:用来跳转下一个页面,作用和浏览器的「前进按钮」一样。
history.forward();
方法3:
解释:向前/向后跳转 n 个页面。
history.go( int n);  // 需要整数作为参数

// 代码举例:
history.go( 1 ); // 向前跳转一个页面,相当于 history.forward()

history.go( 2 ); // 表示向前跳转两个页面

history.go( 0 ); // 刷新当前页面

history.go( -1 ); // 向后跳转一个页面,相当于 history.back()

history.go( -2 ); // 向后跳转两个页面
2
3
4
5
6
7
8
9
10
11
12
<a href="javascript:history.back(); ">回退</ a>
备注:浏览器的前进按钮、后退按钮,在这个位置:

# Location 对象
window.location标识当前所在网址,可以通过给这个属性赋值命令浏览器进行页面跳转
window.location = "https://www.baidu.com";
window.location.href = "https://www.baidu.com";

console.log(location.href); // 获取当前页面的url 路径
2
3
4
举例
<body>
    <input type="button" value="点我去看百度">
    <script>
        let oBtn = document.querySelector("input");

        oBtn.onclick = function(){
            window.location = "https:///www.baidu.com"; //加不加window都行
            window.location.href = "https:///www.baidu.com";
        }
    </script>
</body>
2
3
4
5
6
7
8
9
10
11
# 重新加载当前页面
可以调用location的reload方法以重新加载当前页面,参数true表示强制从服务器强制加载
<body>
    <input type="button" value="刷新">
    <script>
        let oBtn = document.querySelector("input");

        oBtn.onclick = function(){
          //   window.location.reload(); 重新加载当前页面。
            window.location.reload(true); //在方法的参数中传递一个true,则会强制清空缓存刷新页面。
        }
    </script>
2
3
4
5
6
7
8
9
10
# GET请求查询参数
window.location.search属性即为当前浏览器的GET请求查询参数
比如网址https: //www.baidu.com/?a=1&b=2

console.log(window. location.search); // "?a=1&b=2"

//我们在访问网站的时候  网址上会以问号的形式带一些参数给服务器的脚本程序
2
3
4
5
# BOM特效开发1
点击回到顶部
<style>
    body {
        height: 5000px;
        background-image: linear-gradient( to bottom,   green,    skyblue,  pink,   orange);
    }

    #backtotop {
        position: fixed;
        bottom: 100px;
        right: 100px;
        width: 80px;
        height: 80px;
        background-color: rgba(0, 0, 0, 0.4);
        cursor: pointer;
        text-align: center;
        line-height: 80px;
        color: #fff;
        user-select: none;
    }
</style>
</head>
<body>
    <div id="backtotop">回到顶部</div>

    <script>
        let backtotopBtn = document.getElementById("backtotop");
        let timer;

        backtotopBtn.onclick = function () {

            //设表先关
            clearInterval(timer);

            // 设置定时器
            timer = setInterval(function () {
                // 不断让scrollTop卷去的高度减少
                document.documentElement.scrollTop -= 50;

                //定时器要停
                if (document.documentElement.scrollTop <= 0) {
                    clearInterval(timer);
                }
            }, 20);
        };
    </script>
</body>
2
3
4
5
6
7
8
9
10
11
12
13
14
15
16
17
18
19
20
21
22
23
24
25
26
27
28
29
30
31
32
33
34
35
36
37
38
39
40
41
42
43
44
45
46
# BOM特效开发2
DOM元素都有offsetTop属性,表示此元素到定位祖先元素的垂直距离
定位祖先元素:在祖先中,离自己最近的且拥有定位属性的元素
举例
<style>
    #wrap {
        width: 300px;
        height: 300px;
        border: 10px solid skyblue;
        margin: 100px auto 0;
    }

    #box {
        width: 100px;
        height: 100px;
        background-color: orange;
    }
</style>
</head>
<body>
    <div id="wrap">
        <div id="box"></div>
    </div>
    <script>
        let oBox = document.getElementById("box");

        // 净top值 使用这个属性的时候,所有祖先元素不要有定位.表示到页面顶端的举例
        console.log(oBox.offsetTop);
    </script>
2
3
4
5
6
7
8
9
10
11
12
13
14
15
16
17
18
19
20
21
22
23
24
25
开始开发
楼层导航小效果
<style>
    * {
        margin: 0;
        padding: 0;
    }
    ul {
        list-style: none;
    }
    section {
        width: 700px;
        margin: 0px auto 30px;
        background-color: rgba(0, 0, 0, 0.3);
        font-size: 50px;
        text-align: center;
        line-height: 200px;
        color: #fff;
    }

    #floornav {
        position: fixed;
        top: 200px;
        right: 100px;
        background-color: orange;
    }

    #floornav li {
        width: 50px;
        height: 50px;
        text-align: center;
        line-height: 50px;
        color: #fff;
        cursor: pointer;
    }
</style>
</head>
<body>
    <nav id="floornav">
        <ul id="list">
            <li data-n="科技">科技</li>
            <li data-n="人文">人文</li>
            <li data-n="体育">体育</li>
            <li data-n="视频">视频</li>
            <li data-n="娱乐">娱乐</li>
            <li data-n="新闻">新闻</li>
        </ul>
    </nav>

    <section style="height: 200px" data-n="科技">科技栏目</section>
    <section style="height: 300px" data-n="人文">人文栏目</section>
    <section style="height: 400px" data-n="体育">体育栏目</section>
    <section style="height: 500px" data-n="视频">视频栏目</section>
    <section style="height: 600px" data-n="娱乐">娱乐栏目</section>
    <section style="height: 700px" data-n="新闻">新闻栏目</section>

    <script>
        //使用事件委托给li添加监听
        let oList = document.getElementById("list");

        oList.onclick = function (e) {
            if (e.target.tagName.toLowerCase() == "li") {
                // getAttribute表示得到标签身上的某个属性值
                let n = e.target.getAttribute("data-n");
                //可以用属性选择器(就是方括号选择器)来寻找带有相同data-n的section
                let oSection = document.querySelector("section[data-n = " + n + "]");
                //让页面的卷动自动成为这个盒子的offsetTop值
                document.documentElement.scrollTop = oSection.offsetTop;
            }
        };
    </script>
</body>
2
3
4
5
6
7
8
9
10
11
12
13
14
15
16
17
18
19
20
21
22
23
24
25
26
27
28
29
30
31
32
33
34
35
36
37
38
39
40
41
42
43
44
45
46
47
48
49
50
51
52
53
54
55
56
57
58
59
60
61
62
63
64
65
66
67
68
69
70
继续完善点击变色
<!DOCTYPE html>
<html lang="en">
    <head>
        <meta charset="UTF-8" />
        <meta name="viewport" content="width=device-width, initial-scale=1.0" />
        <title>Document</title>
        <style>
            * {
                margin: 0;
                padding: 0;
                transition: 0.5s ease;
            }
            ul {
                list-style: none;
            }
            body {
                height: 5000px;
            }

            section {
                width: 700px;
                margin: 0px auto 30px;
                background-color: rgba(0, 0, 0, 0.3);
                font-size: 50px;
                text-align: center;
                color: #fff;
                transition: 0.5s ease;
            }

            #floornav {
                position: fixed;
                top: 200px;
                right: 100px;
                background-color: orange;
            }

            #floornav li {
                width: 50px;
                height: 50px;
                text-align: center;
                line-height: 50px;
                color: #fff;
                cursor: pointer;
            }

            #floornav li.active {
                background-color: hotpink;
                color: black;
            }
        </style>
    </head>
    <body>
        <nav id="floornav">
            <ul id="list">
                <li data-n="科技" class="active">科技</li>
                <li data-n="人文">人文</li>
                <li data-n="体育">体育</li>
                <li data-n="视频">视频</li>
                <li data-n="娱乐">娱乐</li>
                <li data-n="新闻">新闻</li>
            </ul>
        </nav>

        <section style="height: 400px" data-n="科技">科技栏目</section>
        <section style="height: 500px" data-n="人文">人文栏目</section>
        <section style="height: 600px" data-n="体育">体育栏目</section>
        <section style="height: 700px" data-n="视频">视频栏目</section>
        <section style="height: 800px" data-n="娱乐">娱乐栏目</section>
        <section style="height: 900px" data-n="新闻">新闻栏目</section>

        <script>
            //使用事件委托给li添加监听
            let oList = document.getElementById("list");
            let aLi = document.querySelectorAll("#list li");
            let aSection = document.querySelectorAll("section");

            let timer;

            oList.onclick = function (e) {
                if (e.target.tagName.toLowerCase() == "li") {
                    // getAttribute表示得到标签身上的某个属性值
                    let n = e.target.getAttribute("data-n");
                    //可以用属性选择器(就是方括号选择器)来寻找带有相同data-n的section
                    let oSection = document.querySelector("section[data-n = " + n + "]");
                    //让页面的卷动自动成为这个盒子的offsetTop值
                    document.documentElement.scrollTop = oSection.offsetTop;
                }
            };

            //在页面加载好之后,将所有的section盒子的offsetTop值推入数组
            let offsetArr = [];

            // 遍历所有的contentPart,将它们的净位置推入数组
            for (let i = 0; i < aSection.length; i++) {
                offsetArr.push(aSection[i].offsetTop);
            }

            // 为了最后一项可以方便比较,我们可以推入一个无穷大
            offsetArr.push(Infinity);
            // 当前所在楼层
            let nowFloor = -1;

            // 窗口卷动
            window.onscroll = function () {
                // 得到当前的窗口卷动值
                let scrollTop = document.documentElement.scrollTop;
                let i;
                // 遍历offsetTopArr数组,看看当前的scrollTop值在哪两个楼层之间
                for (i = 0; i < offsetArr.length; i++) {
                    if (scrollTop >= offsetArr[i] && scrollTop < offsetArr[i + 1]) {
                        break;
                    }
                }
                // 退出循环的时候,i是几,就表示当前楼层是几
                // 如果当前所在楼层,不是i,表示换楼了
                if (nowFloor != i) {
                    console.log(i);

                    // 让全局变量改变为这个楼层号
                    nowFloor = i;

                    // 设置下标为i的项有active
                    for (let j = 0; j < aLi.length; j++) {
                        if (i == j) {
                            aLi[j].classList.add("active");
                        } else {
                            aLi[j].classList.remove("active");
                        }
                    }
                }
            };

            console.log(aLi);
        </script>
    </body>
</html>
2
3
4
5
6
7
8
9
10
11
12
13
14
15
16
17
18
19
20
21
22
23
24
25
26
27
28
29
30
31
32
33
34
35
36
37
38
39
40
41
42
43
44
45
46
47
48
49
50
51
52
53
54
55
56
57
58
59
60
61
62
63
64
65
66
67
68
69
70
71
72
73
74
75
76
77
78
79
80
81
82
83
84
85
86
87
88
89
90
91
92
93
94
95
96
97
98
99
100
101
102
103
104
105
106
107
108
109
110
111
112
113
114
115
116
117
118
119
120
121
122
123
124
125
126
127
128
129
130
131
132
133
134
135
136
← 14-dom事件与机制 16-面向对象 →